5 Android Studio settings that will make your work faster and more convenient
Hello! Today I want to share some tips that will significantly boost your productivity in Android Studio. Interested? Let’s dive in!
Reed UA Version here.
Android Studio is a great tool for Android app development with tons of built-in functionality and settings. That’s why it’s not all set up perfectly out of the box, so here are my top 5 tips on how to configure Studio and enjoy the process.
1. Take control of your Keymap and forget about the mouse forever
Back in university, I was hit on the hands with a stick whenever I tried to use the mouse to run a lab 😅. Because of this, I got used to relying entirely on the keyboard. And that’s why my first tip when conquering Android Studio is to get familiar with keyboard shortcuts!
You’ll probably say, “Wait, wait, wait, there are a million shortcuts, and they’re scattered all over the keyboard, it’s impossible to remember them, and my fingers won’t always be able to press them all.”
Yes, that’s true, there’s a lot of scattered functionality right out of the box. That’s why I recommend binding your own shortcuts.
Here’s how to do it:
- Open
Android Studio → Settings → KeymaporCmd + ,(orFile → Settings → Keymapon Windows/Linux) - Search for the action you need (e.g., “Close Tab” or “Run”)
- Click Add Keyboard Shortcut, enter the desired combination, and save it.
Here’s a list of my favorite shortcuts:
- Close Window:
Cmd + W(Mac) /Ctrl + W(Windows/Linux) - Close project (but not the Studio itself):
Cmd + Option + W - Split the screen into two:
Shift + S - Move a file right:
Shift + Option + S - Run build on the emulator or device:
Cmd + R - Start the debugger:
Cmd + D.
Bonus: If you’ve worked in Visual Studio, NetBeans, or Eclipse before, you can enable their keymaps to make transitioning easier.
2. Integrate your service accounts and keep everything under control
Android Studio offers tons of great integrations. Right out of the box, we have GitHub and Firebase — two of the most popular services for storing and sharing code and product analytics. You can also add Jira, Azure, and many other services.
Here’s how to connect GitHub in Android Studio:
- Open settings:
Settings → Version Control → GitHub → Add Account - Log in with your username/password or connect via SSH key or token
- Now you can commit, push, and create Pull Requests directly from the IDE (plus conduct Code Reviews and much more).
You can keep multiple accounts, for example, personal and work, but just don’t forget to switch between them when switching projects.
And here’s how to connect Firebase Crashlytics:
Tools → Firebase → Crashlytics- Set up Firebase in your project (you’ll need to log in with your Google account)
- Go to
App Quality Insights → Firebase Crashlytics(I recommend adding a shortcut for this 😉). Now, you can view crash logs and jump to the problematic code directly in the IDE.
3. Plugins — they’re everything
Continuing the integration theme, I can’t skip plugins, and how we can tune Android Studio with them.
Here’s my must-have list:
- Azure DevOps or Jira — if you work with one of these services for task management, I highly recommend adding a plugin for tracking tasks and formatting commit messages according to Jira or Azure rules
- Github Workflows — another awesome plugin I recommend using for monitoring your CI/CD (of course, if you have it, I hope you do). It also supports other CI/CD services, like Jenkins
- JsonToKotlin — if you often need to create models from JSON files, I recommend installing this plugin so you don’t have to do it manually every time
- Dart, Flutter, and Kotlin Multiplatform — if you plan to use Studio for multi-platform development, these plugins are for you. Also, to make your KMP project look a bit nicer, you can add the KMP ProjectView.
However, don’t go overboard with this as each added plugin adds to your memory usage. So, turn off anything you don’t need. You can disable plugins in Settings → Plugins → Installed.
4. How to speed-up project build
I’ll continue on the topic of RAM. If your work machine allows it, I highly recommend increasing the allocated memory in Android Studio settings. Of course, it will thank you and ask for more, but you’ll also feel the difference in speed and smoothness of work!

There are two ways to increase Android Studio’s memory: local (for a specific project) and global. I recommend setting up both. Go to Settings:Appearance & Behavior → System Settings → Memory Settings.
You should see something similar to the screenshot:
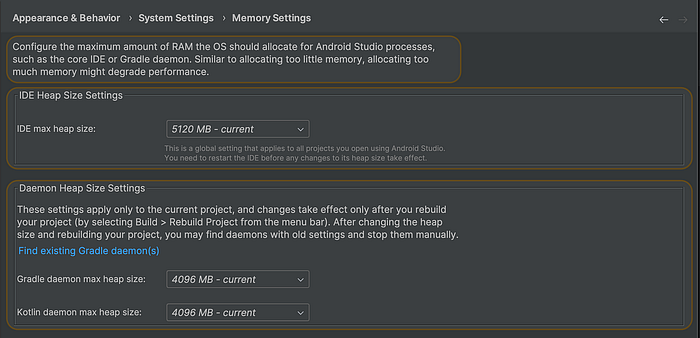
Appearance & Behavior → System Settings → Memory SettingsHere, you can configure the Heap size for Android Studio and its processes, as well as, Gradle and its build operations.
Important: these parameters should be adjusted to maximize efficiency. I follow this rule: TotalRAM / 2 — this is how much I can allocate to Android Studio and Gradle.
Additionally, I recommend configuring memory settings locally, per project. These settings are found in the gradle.properties file:
org.gradle.jvmargs=-Xmx2g -XX:MaxMetaspaceSize=512m -XX:+UseParallelGC
org.gradle.daemon=true
org.gradle.parallel=true
org.gradle.caching=true
org.gradle.configureondemand=trueorg.gradle.jvmargs— defines the memory allocated to Gradle (overriding the global setting in Android Studio). It also sets Java’s Metaspace size, which helps in large projects with many dependencies. Additionally, enabling Parallel Garbage Collection (GC) speeds up Gradle.org.gradle.daemon=true— keeps Gradle running in the background as a daemon, allowing it to reuse resources for subsequent buildsorg.gradle.parallel=true— if project modules are independent, Gradle will build them in parallel (+1 reason to properly modularize your project)org.gradle.caching=true— if a file is already in the cache, Gradle won’t rebuild it but will reuse the cached versionorg.gradle.configureondemand=true— gradle will only configure the modules needed for the current task instead of configuring the entire project.
These memory optimizations will allow Android Studio to use your computer’s resources efficiently saving you time on builds and sparing your nerves. 🚀
5. Code snippers & File templates and how to deal with boilerplate
Speaking of saving time, it’s also worth mentioning that we often deal with a lot of boilerplate tasks when configuring a project or developing a new feature. Have you ever manually set up a new module in your project, copying and pasting Dagger configurations, build.gradle dependencies, and so on? That’s exactly what File Templates in Android Studio are for—they help automate boilerplate creation.
To add your template, go to: Preferences → Editor → File and Code Templates, then add a new template and paste the necessary code into it.
For example, we can automate the creation of use cases:
package ${PACKAGE_NAME}

class ${CLASS_NAME}UseCase {
  suspend fun execute(): kotlin.Result<${RESULT_NAME}> {
    TODO("Not yet implemented")
  }
}
Now, when you create a new file, you’ll be able to select your template instead of writing everything from scratch.
Android Studio allows you to create templates for entire groups of files, similar to how it works when creating a new project, module, or even a new Fragment + XML + ViewModel setup. Let me know in the comments if you’re interested in learning how to set this up, and I’ll cover it in a separate article!
6. Bonus: How not to lose all your settings and avoid setting everything up again after reinstalling Android Studio?
Repeating all these steps every time can be boring, especially if you’ve configured a lot of things. That’s why JetBrains came up with mechanisms to synchronize all your settings.
For now, I recommend using the simplest option:
Settings → Manage IDE Settings → Export Settings, since all automated options are either deprecated or broken.
This will generate a file containing all your settings. You can create a separate GitHub repository and manually store this file there. Next time you need to configure Android Studio, you’ll be able to do it much faster.
Let me summarize and quickly go over the most important points:
- Use hotkeys and don’t be afraid to customize them to your needs
- Integrate all the services you frequently work with through plugins
- Plugins are great but do not overload your Android Studio with them
- Balance the available RAM for Studio and Gradle, and you’ll get a great boost in project analysis and build speed
- Automate your boilerplate using File Templates
- Save your settings so you don’t have to set everything up from scratch next time.
Try out these settings and let me know which ones improved your productivity the most! That’s all from me. Thank you so much for reading my article. I’d also appreciate a like if you found it useful!